RAM-INGEST — Install and User Guide
RAM-INGEST is a menu bar app for backing up camera cards. Insert a card and it copies the card to the drives you chose, reads every copy back, compares it with the card, and only then tells you the card is safe to format. It never writes to the card and has no format feature.
This guide covers RAM-INGEST 0.3.0. Questions: stage@ramstudio.kr
1. Requirements
- macOS 14 Sonoma or later
- Apple silicon or Intel Mac
- Backup drives. A dedicated APFS-formatted SSD is recommended.
- Keep copies on different drives. RAID is not a backup.
2. Install
- On the product page, click Download free version to get
RAM-INGEST.dmg. - Double-click the DMG to open it.
- Drag the RAM-INGEST icon onto the Applications folder next to it.
- Close the window and eject the RAM-INGEST disk from the Finder sidebar.
First launch: “Open Anyway”
The current build is not notarized by Apple yet, so macOS shows a warning the first time. The exact wording differs between macOS versions.
macOS 15 Sequoia or later
- Open RAM-INGEST from Applications. When the warning appears, click Done.
- Open System Settings → Privacy & Security.
- At the bottom, in the Security section, there is a line saying RAM-INGEST was blocked. Click Open Anyway next to it.
- In the next dialog, click Open Anyway again and enter your Mac password.
macOS 14 Sonoma
- The same System Settings → Privacy & Security → Open Anyway route works.
- Or Control-click RAM-INGEST in Applications, choose Open, then click Open in the dialog.
You only do this once.
3. First run
RAM-INGEST does not appear in the Dock. Click the card icon in the menu bar at the top of the screen to open its window.
If macOS asks whether to allow notifications, allow them. You get a notification each time a card finishes.
License agreement
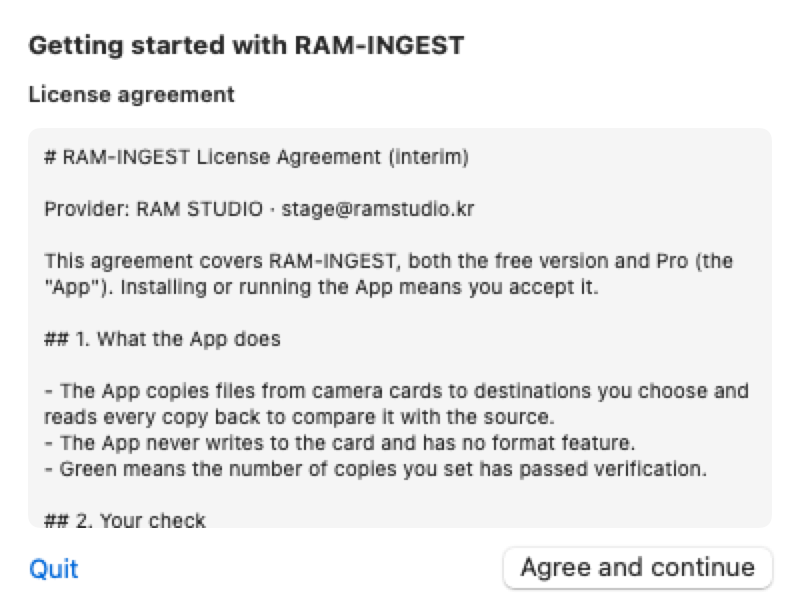
The first time, the Getting started with RAM-INGEST window shows the license agreement. Read it and click Agree and continue, or Quit if you do not agree. If the agreement changes, the app asks again on the next launch.
Permission check
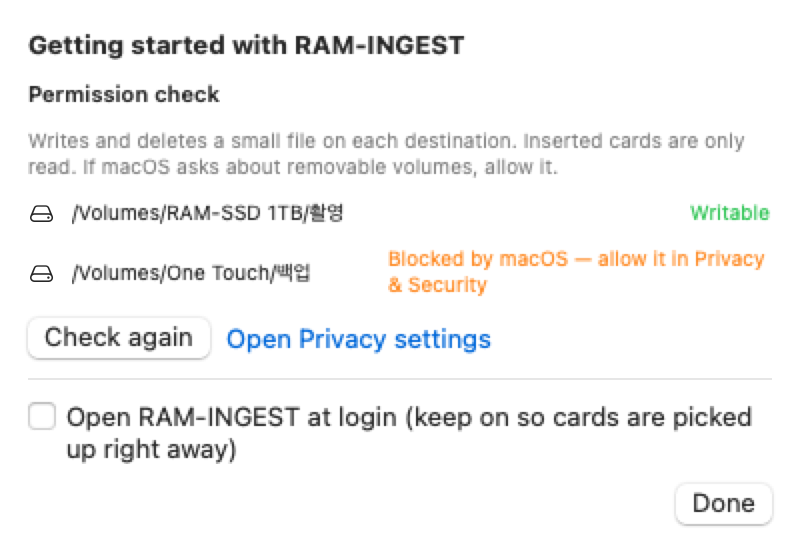
Next comes the Permission check. The app writes and deletes a small file on each destination. Inserted cards are only read.
- Each line shows a result. Writable means it is fine.
- Blocked by macOS — allow it in Privacy & Security: click Open Privacy settings, allow RAM-INGEST, then click Check again.
- No response — allow the macOS permission prompt on screen: a macOS prompt is open somewhere on screen. Allow it.
- No lines yet means no destination is set. Set one and check again.
Login item
Turn on Open RAM-INGEST at login so the app starts with your Mac and picks up cards right away.
- “Allow RAM-INGEST in System Settings › General › Login Items” — allow it there.
- “This build can't turn it on” — add RAM-INGEST yourself in System Settings › General › Login Items.
Click Done when finished. You can reopen this screen any time from the … button at the bottom of the menu window → License, permissions, login item…
The macOS “removable volumes” prompt
The first time a card is read or an external drive is written, macOS asks whether RAM-INGEST may access removable volumes. Click Allow. Copying stays at 0% until you answer.
4. Project and destinations
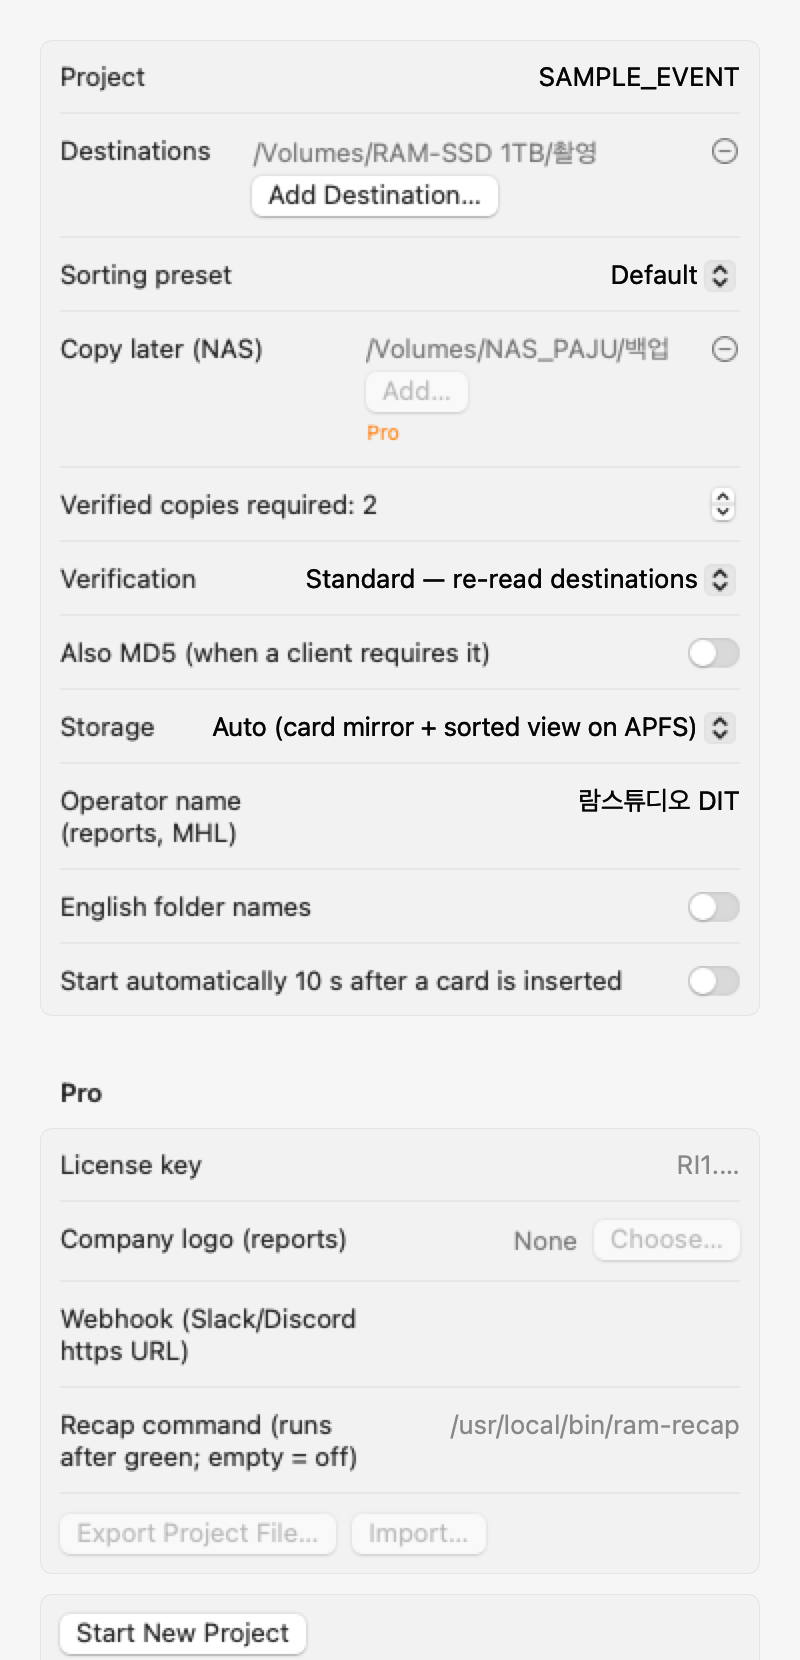
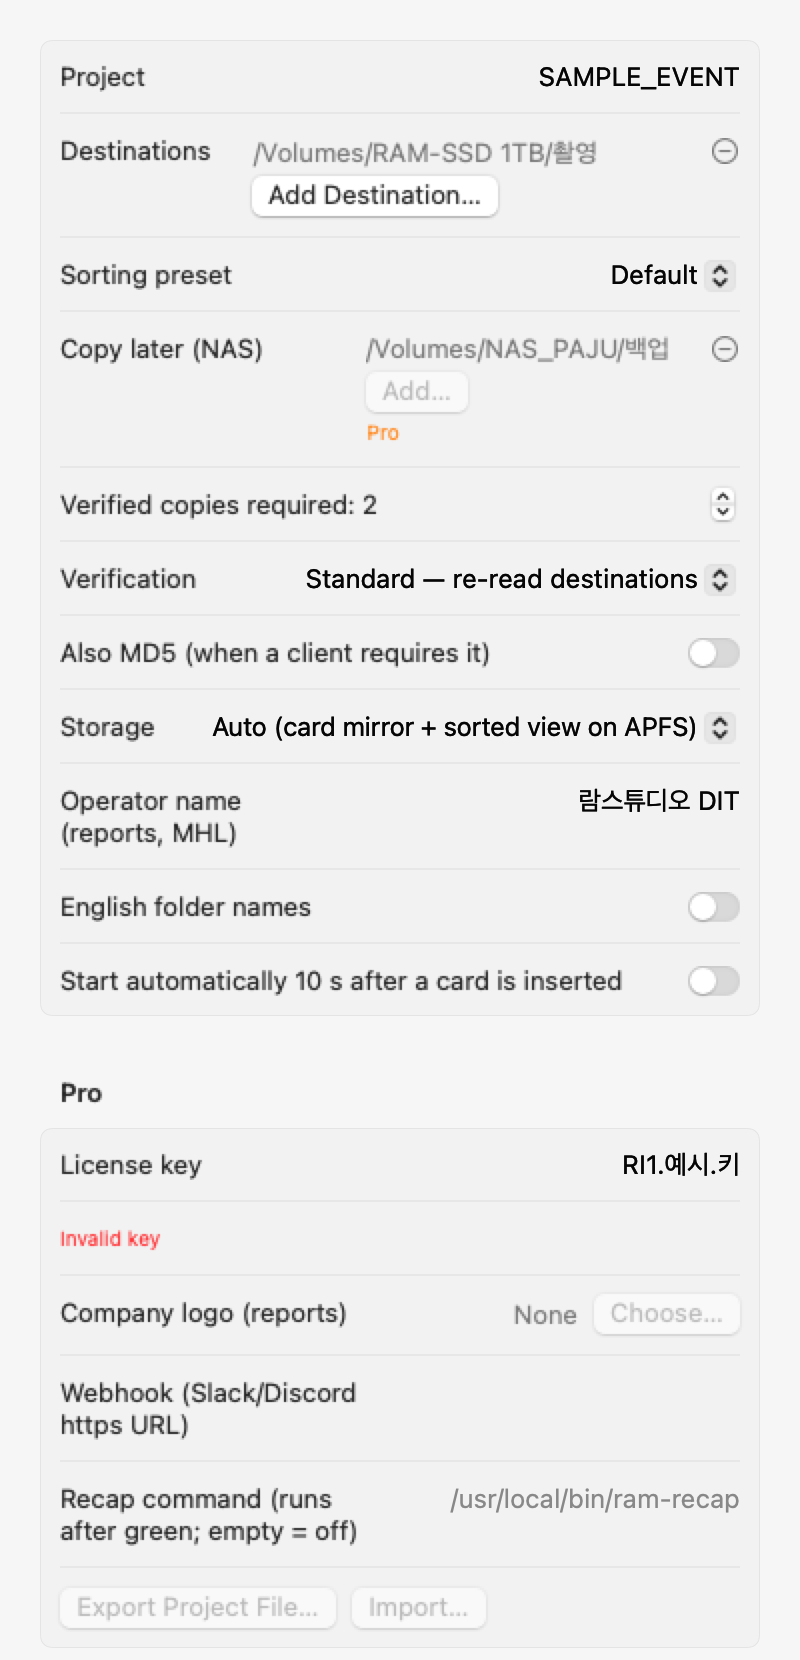
At first, the settings are open in the menu window. Set a project name and destinations and you are ready. To change them later, click Settings at the top right of the menu window.
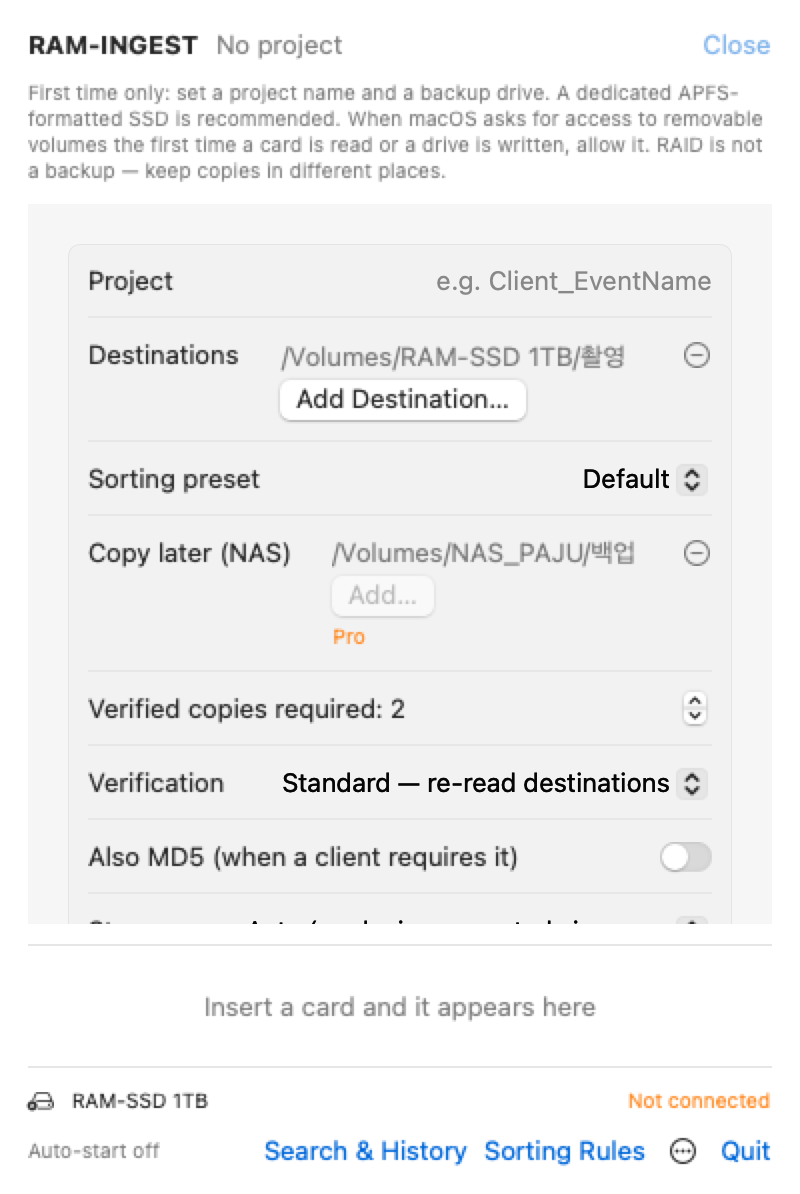
- Type a name in Project. A
<shoot date>_<project> folder is created under each destination, e.g. 20261024_SAMPLE_EVENT. - Click Add Destination… and choose the first backup folder.
- Click Add Destination… again and choose a folder on a different drive. Two copies is the default.
- Check Verified copies required. The default is 2. A card turns green only when every file has this many verified copies.
Other settings
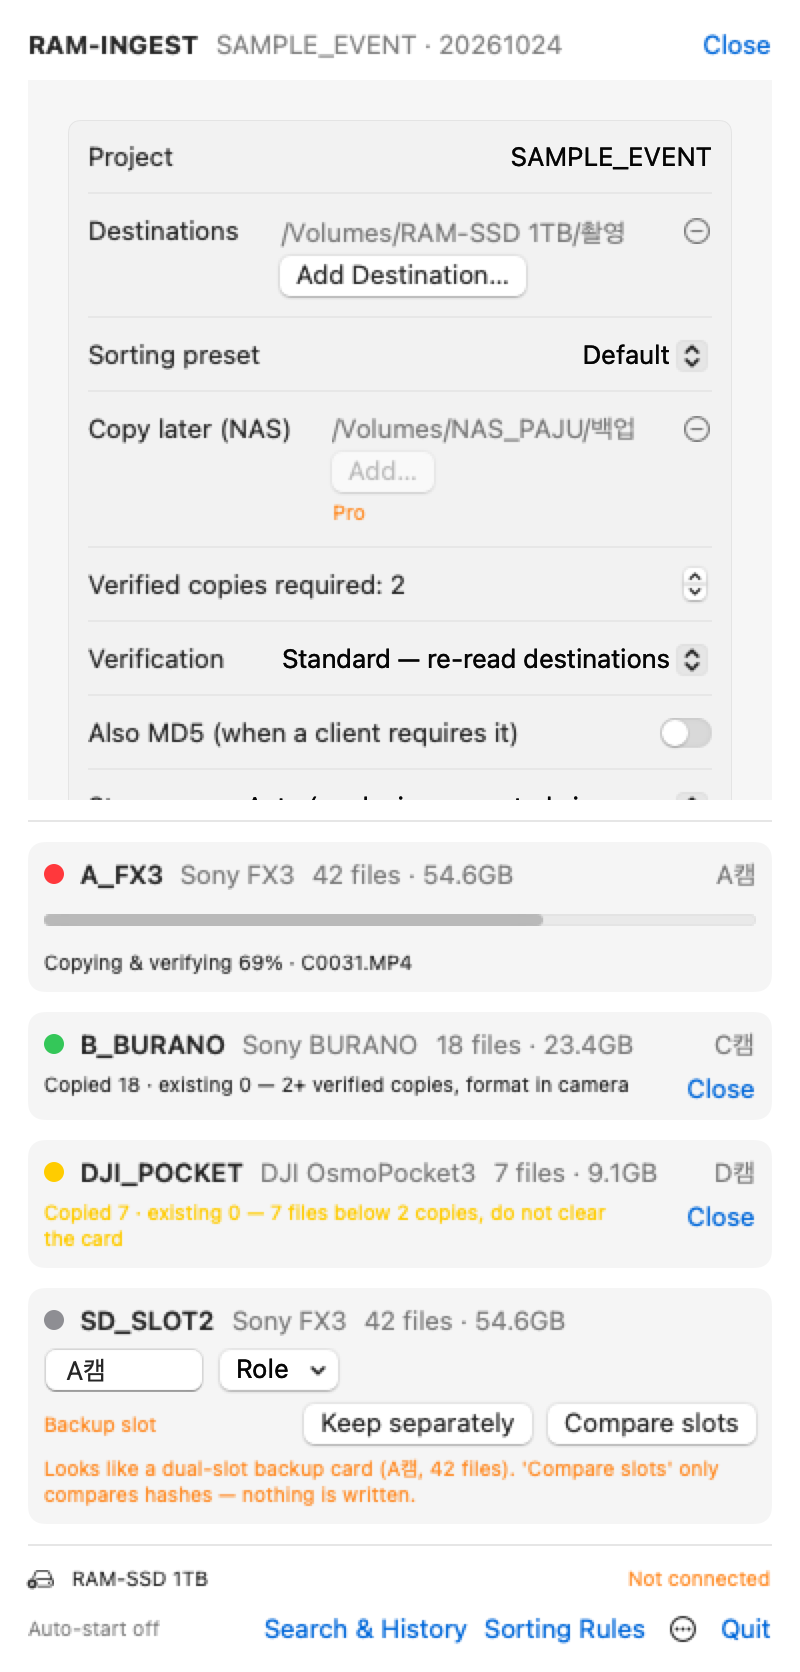
- Sorting preset — the rule set that decides which category folder each clip goes to. Default at first.
- Verification — Standard — re-read destinations is the default. Paranoid — re-read the card too is slower and also re-reads the card. Fast — no re-read (never green) skips the re-read, so a card never turns green.
- Also MD5 (when a client requires it) — turn on only when a client asks for MD5.
- Storage — Auto (card mirror + sorted view on APFS), Sorted only or Card mirror + sorted view.
- Operator name (reports, MHL) — the name written into reports and MHL.
- English folder names — folder names in English (
01_FOOTAGE and so on). - Start automatically 10 s after a card is inserted — off by default. When on, copying starts by itself 10 seconds after a card is inserted.
- Start New Project — use it when you move to another day or shoot. It clears the project name and date.
When you plug in a new drive
If you connect an external drive the app has not seen since it started, the menu window asks “Use new drive '…' as a backup destination?”. As destination creates a RAM-INGEST folder on that drive and adds it as a destination. Ignore stops asking about a drive with that name.
5. Ingesting a card
Steps
- Insert the card in a reader. It appears in the menu window with Reading the card for a moment.
- The camera model, file count and size appear next to the card name. The camera name field (A-cam, B-cam …) can be edited.
- If needed, choose Locked-off cam — all wide or Interview cam — all interview from the Role menu. Otherwise clips are sorted by length.
- Click Start. With auto-start on, “Starting in N s” counts down and copying starts by itself. Click Hold to stop the countdown and edit the camera name.
- When the Copying & verifying N% bar finishes, a color and a result line appear.
- On green, the app ejects the card. Put it back in the camera and format it there.
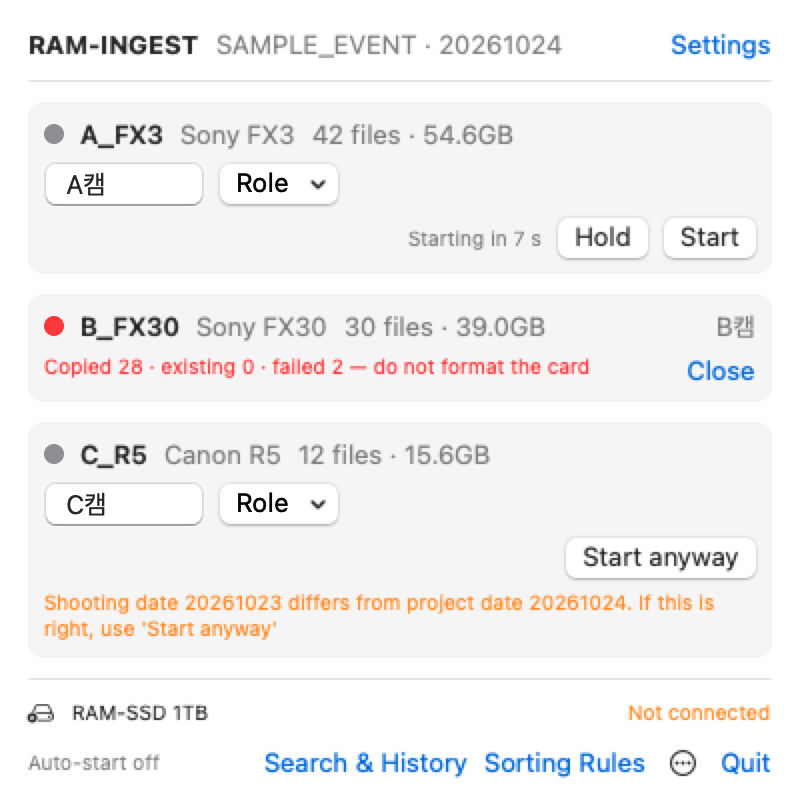
Several cards are taken in turn. A waiting card shows Starts when the previous card finishes.
What the colors mean
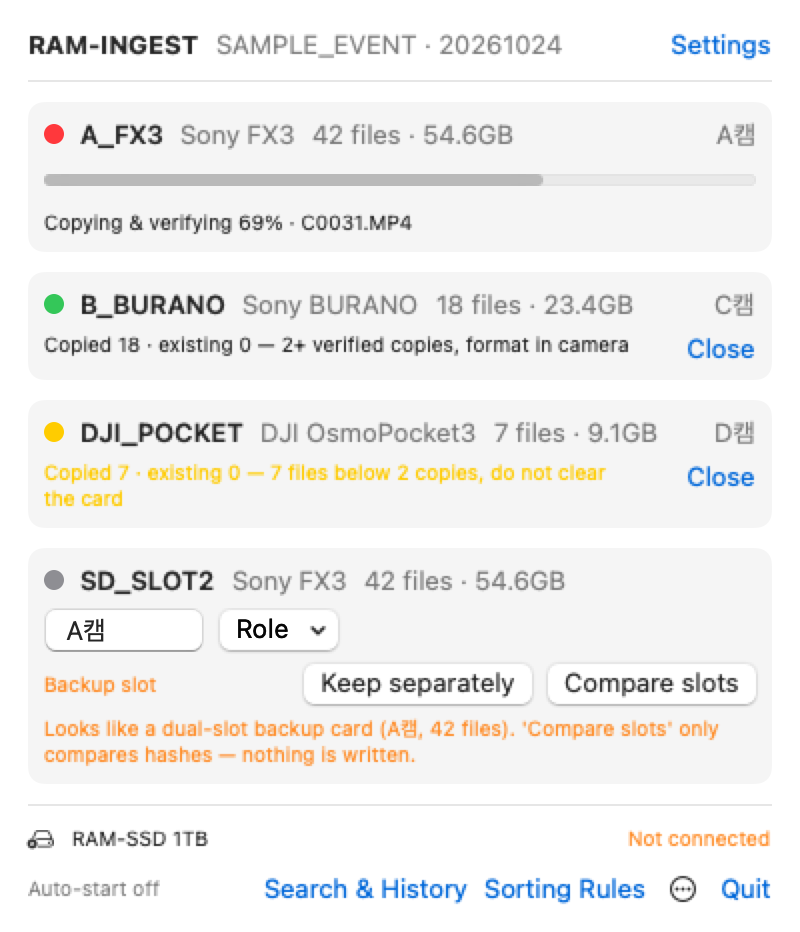
- Green — safe to format. Every file on the card has at least the required number of verified copies (2 by default). Line: “Copied N · existing N — 2+ verified copies, format in camera”
- Yellow — copies short. Copies were verified but some files are below the required number. Line: “N files below 2 copies, do not clear the card”. This happens when a destination drive is missing or only one destination is set.
- Red — check needed. A file failed or the job stopped. The line ends with “do not format the card”. The dot is also red while copying is in progress: do not format until it ends.
- Gray — waiting. The card has not started yet.
The menu bar icon follows the worst state among inserted cards. The icon is black and white, so shape and text tell the states apart.

- Card + RAM-INGEST — no card, or waiting
- Warning triangle + Check needed — something is red (including copying)
- Filled card + Copies short — something is yellow
- Check mark + Safe to format — everything is green
A macOS notification also arrives each time a card finishes.
If you see these lines
- Already backed up — A-cam, all N files have 2+ verified copies — you inserted a card that was already ingested. Nothing is copied again; it ends green.
- Previously ingested (A-cam) · N new files — the card has new files since last time. Starting copies only the new files.
- Shooting date … differs from project date … — a card from another day may be mixed in. If it is right, use Start anyway; otherwise Settings → Start New Project.
- Looks like a dual-slot backup card — the second-slot card from the same camera. Compare slots writes nothing and only compares hashes. If they match: “Both slots identical — this card is safe to format too”. If not, Keep separately ingests it as
<camera>_SLOT2. - Removable media without camera folders — e.g. an audio recorder or a plain SD card. It is sorted only by file type and date, and never starts automatically.
- Reader connected at … — fast cards will not reach full speed — the reader or cable is on a slow link. Try another port or cable.
- No progress. If macOS is asking for access to removable volumes, allow it. — see the permission check in “3. First run”.
- Eject failed — these apps hold card files: … — quit the listed app (Premiere, Finder preview and so on) and eject the card in Finder.
- Report this camera… — the app does not know this camera. It saves the folder structure only (no file contents or names) as a text file. Send it to stage@ramstudio.kr and we use it to add camera support.
6. Reports
Reports are written inside the <shoot date>_<project> folder on each destination.
ascmhl/ — ASC MHL files (verified hash lists) and ascmhl_chain.xml. Each ingest adds a new generation._리포트/<camera>_<date-time>_clips.csv — clip list, saved so Excel shows Korean correctly._리포트/<camera>_<date-time>_job.json — the same record for machines._리포트/<camera>_<date-time>_ingest.pdf — the human-readable report. The first page shows the result color, card, clip counts, verification per destination and operator.
With English folder names on, _리포트 is _REPORTS.
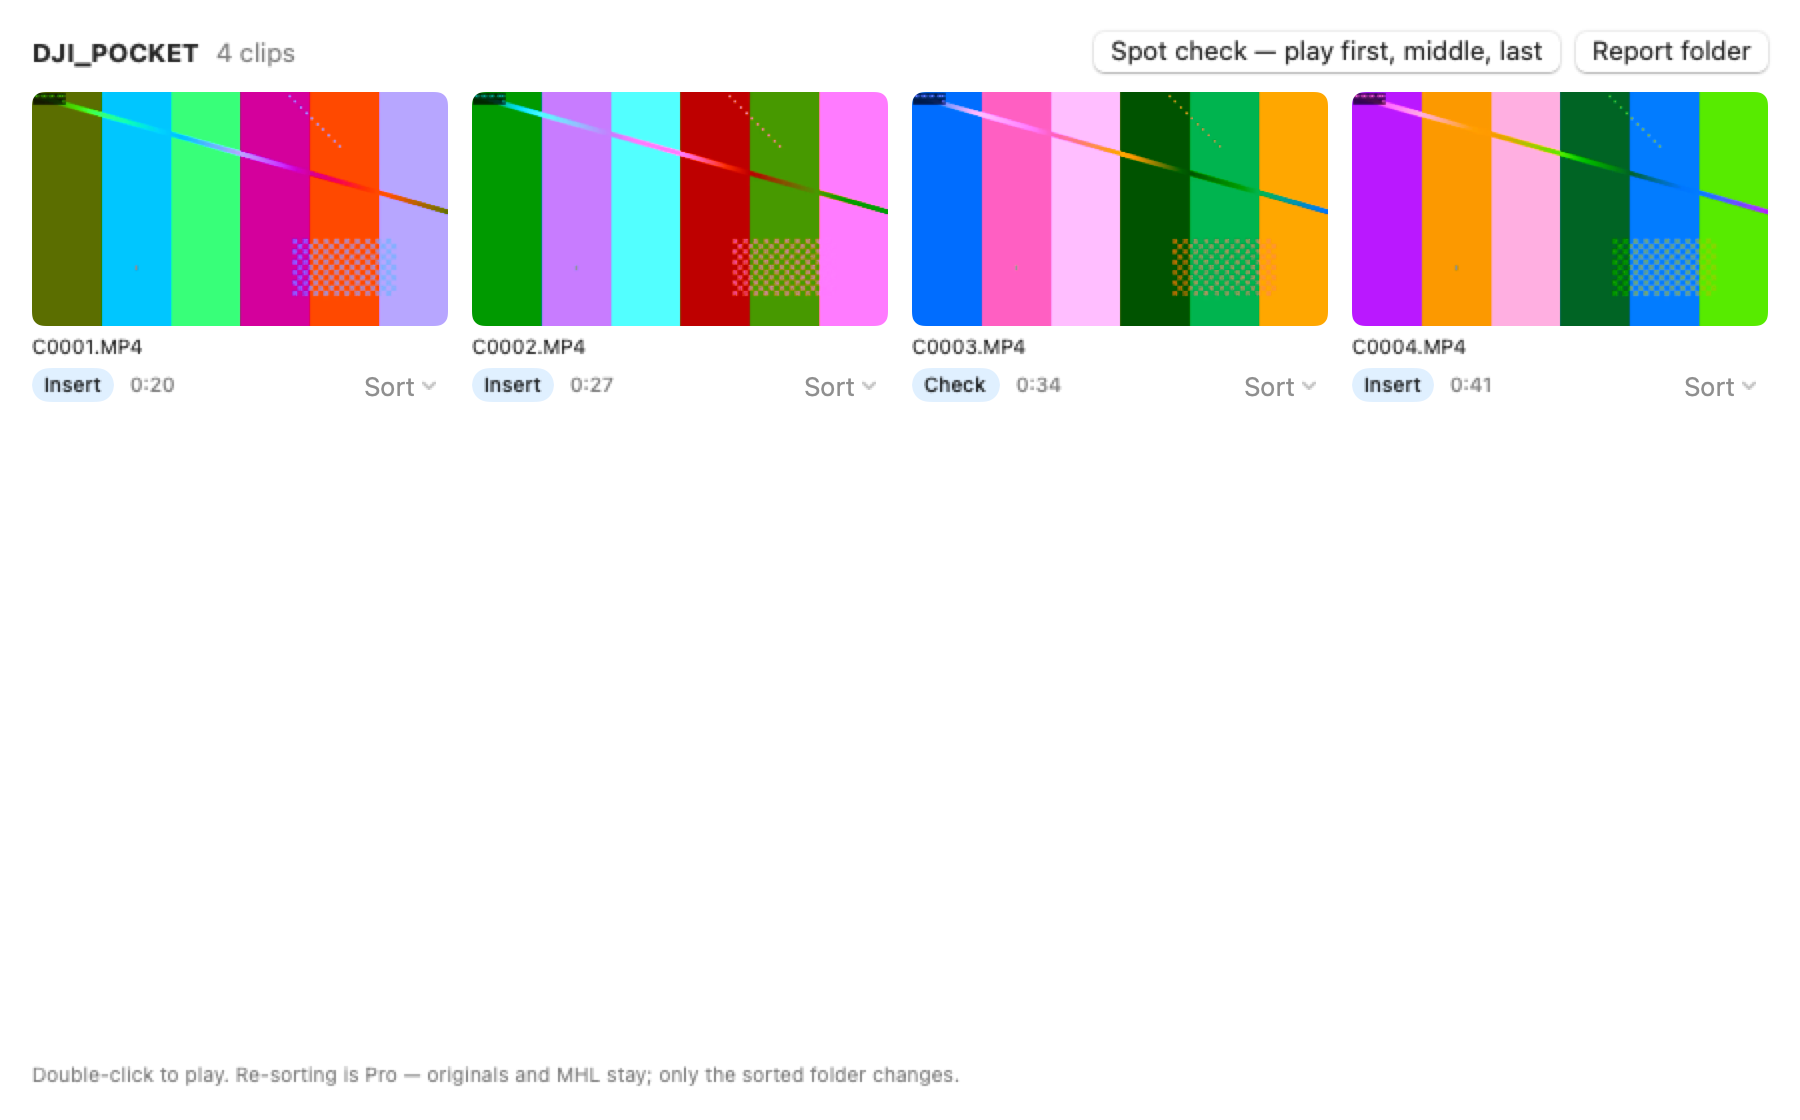
Click Report on a finished card to open the report window. It shows clip thumbnails and categories. Spot check — play first, middle, last plays three clips. Report folder opens the report folder in Finder. Double-click a thumbnail to play it.
7. Entering a Pro key
- Click Settings at the top right of the menu window.
- Scroll down to Pro and paste the whole key from your email (it starts with
RI1.) into License key. - When a green line like “email · pro · 1 seats · updates until YYYY-MM-DD” appears, you are done.
The key is checked inside the app by its signature, so no internet connection is needed.
- Invalid key — check that nothing was cut off and copy it from the email again.
- This key has been revoked — contact the seller — the key was refunded or revoked. Contact stage@ramstudio.kr.
- “This version came out after your update period ended” — your features keep working. Renew to keep getting new versions.
8. Pro features
Copy, verification, the safe-to-format check and MHL, CSV and PDF reports all work in the free version. Pro unlocks the following.
- Copy later (NAS) — add a NAS or office drive with Add… in Settings. When that drive is reachable, the project folders on your primary destinations are copied and verified to it, only while no card is being copied. If this fills the required number of copies, a yellow card turns green.
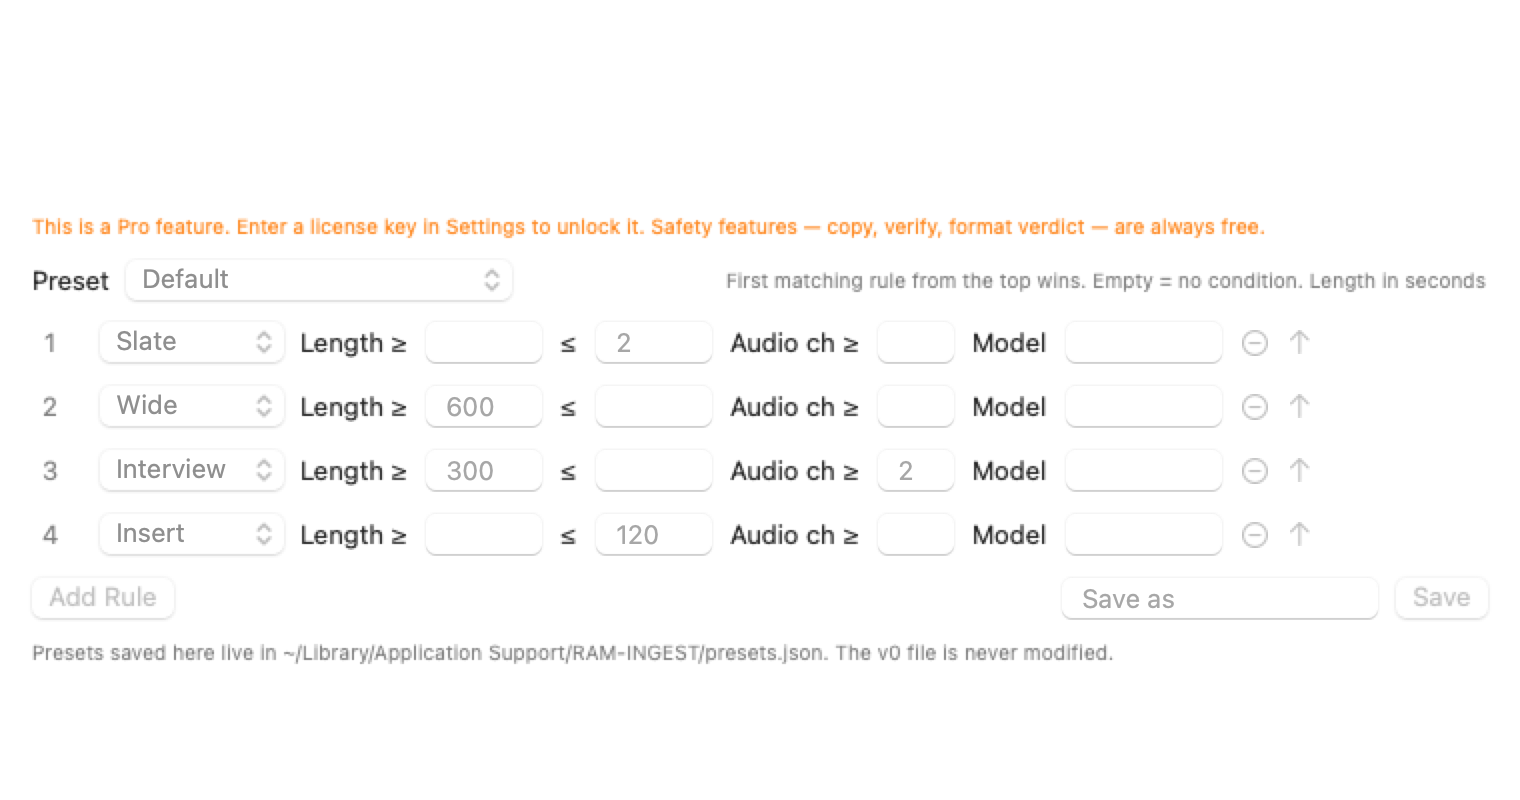
- Sorting Rules — click Sorting Rules at the bottom of the menu window. The first matching rule from the top wins. Set conditions by length (seconds), audio channels and camera model, then Save.
- Company logo (reports) — Choose… a PNG or JPEG logo to place on the first page of the PDF report.
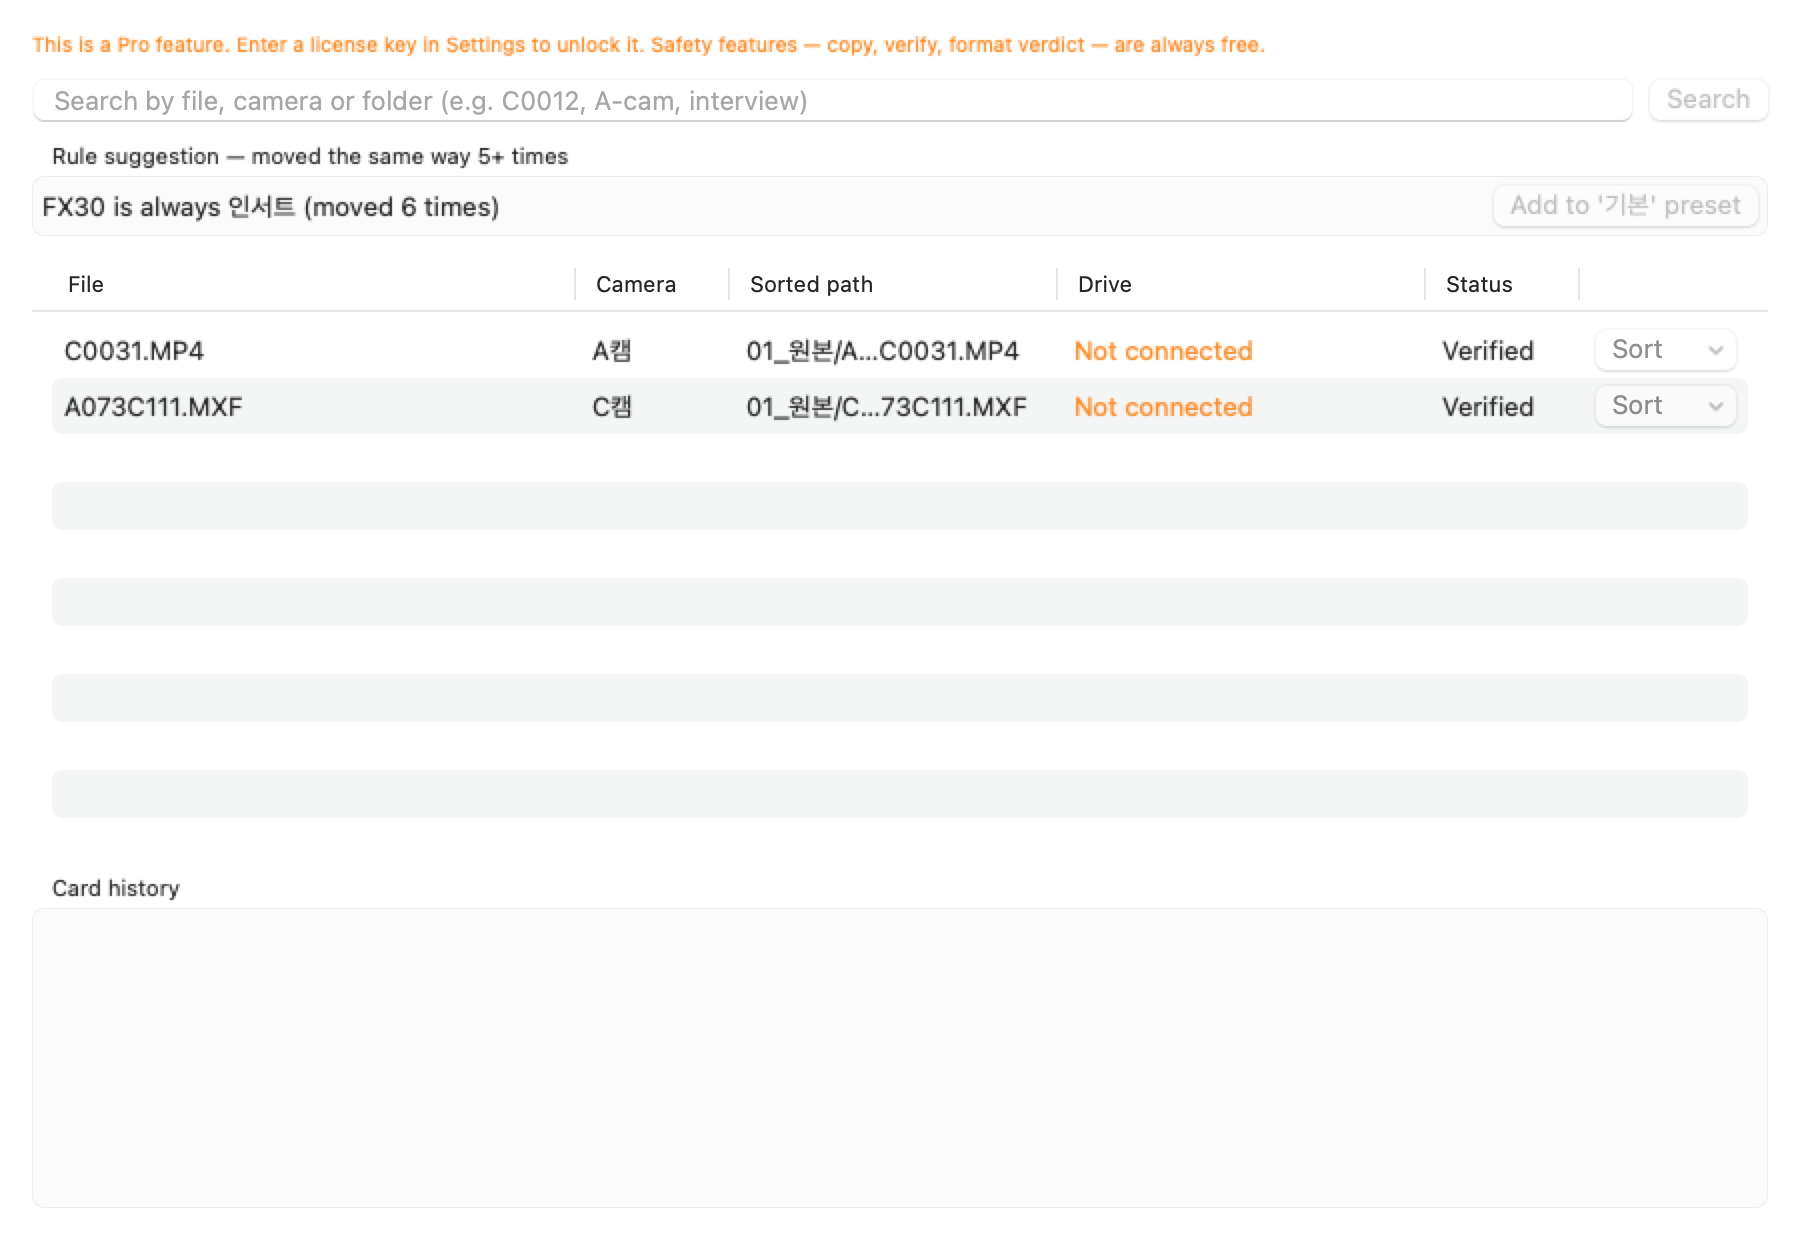
- Search & History — at the bottom of the menu window. Find ingested files by file name, camera or folder, and see which drive holds them and whether they are verified. Re-sorting moves only the sorted folder; originals and MHL stay. After the same move 5+ times, a rule suggestion appears.
- Re-sorting in the report window — the Sort menu under each thumbnail.
- Webhook (Slack/Discord https URL) — sends one result line each time a card finishes.
- Recap command (runs after green; empty = off) — for every card that ends green, writes a clip list file and runs your command. If the command fails, the backup result and green stay as they are.
- Export Project File… / Import… — share the project name, destinations, rules and camera names as one
.ram-ingest.json file, to ingest on another Mac with the same setup.
9. Troubleshooting
I inserted a card but it does not show up.
- Check that the RAM-INGEST icon is in the menu bar. If not, open the app from Applications again.
- Check that Finder shows the card. If Finder does not, it is a reader or cable problem.
- The installer DMG and disks containing an app or installer package are not treated as cards.
- An external SSD without camera folders is treated as a destination candidate, not a card.
It is stuck at 0%.
A macOS permission prompt may be hidden behind other windows. Once you allow it, copying continues. Open … → License, permissions, login item… and click Check again to see which drive is blocked.
The card turned red.
Do not format the card. The result line says why. Check that no destination drive was disconnected or ran out of space, then reinsert the card and click Start. Files already verified are not copied again. If it stays red, send diagnostics as below.
The card turned yellow.
Do not clear the card. There are not enough verified copies. Connect the missing destination drive and ingest the card again. With Pro's Copy later (NAS), the copies are filled when that drive becomes reachable.
Sending diagnostics
- Click the … button at the bottom of the menu window → Export diagnostics…
- Choose where to save it. The default is the Desktop, named
RAM-INGEST-diagnostics-<date>.zip. - Email the zip to stage@ramstudio.kr with a line or two about what happened.
The zip contains the app log, a summary of copy states, recent report list, macOS, Mac model and connected drives, app settings, and RAM-INGEST crash reports. The license key and webhook URL are masked. No file contents from cards or copies are included.
10. Updates, refunds, support
- Updates — the app checks for a new version once a day on its own. To check right away, click Check for Updates in the menu window. When a new version is out, a window shows what changed; click Install Update and the app downloads it, installs it and reopens. If a card is being copied, the install waits until the copy is done. Settings and history are kept. On a Mac without internet, or if this does not work, download the DMG again from the product page and replace the app in Applications. If the “unidentified developer” window appears again when the updated app first opens, open it the same way as in section 2.
- Update period — the Pro price includes one year of updates. After that, the version you have keeps all its features.
- Refunds — ask by email to stage@ramstudio.kr within 30 days of purchase and we refund it, no questions asked. Refunded keys are added to the revocation list. See the refund policy on the product page.
- Support — stage@ramstudio.kr. Please attach the diagnostics zip if something went wrong.